Import Options
Two approaches are available to import library data into Oncord:
- A "Library Data Import Tool" for supported libraries.
- A CSV Documents import tool, specifically for importing library documents / items.
Alternatively, Oncord's migration team can import your library data for you. Contact us to discuss pricing.
Approach One: The Library Data Import Tool
Oncord's library data import tool processes a comprehensive import of libraries, library accounts, borrowings, document types, documents, document items and categories.
The tool is available via Dashboard > AF > Library > Global Configuration > Import.
The tool supports importing data from the following applications:
- Koha, via either a .sql or .sql.gz file export.
- LibraryThing, via a .csv file export.
Note: Running a Koha or LibraryThing import will delete all existing documents, categories, items, borrowings and reservations from the database before importing. If you want to add documents without deleting existing data, use the CSV documents import tool described in Approach Two instead.
Koha Import
The Koha import is a multi-step process that imports the following data in sequence:
- Database Preparation — the uploaded file is parsed and temporary tables are created.
- Libraries — each Koha branch is imported as a library. You can map branches to existing libraries or create new ones.
- Categories — Koha virtual shelves are imported as library categories. You can map these to existing categories or create new ones.
- Document Types — Koha item types (e.g. Book, DVD, Magazine) are mapped to Oncord document types.
- Documents — bibliographic records are imported with title, ISBN, ISSN, synopsis, year, publisher, author, and other metadata.
- Items — individual copies of documents are imported with their barcode, call number, acquisition date, and status (available, lost, or withdrawn).
- Accounts — borrower accounts from Koha are imported as contacts, including name, email, phone, address, and date of birth.
- Borrowings — current and historical borrowings are imported, preserving borrowing dates, due dates, and return dates.
To start a Koha import:
- Go to Dashboard > AF > Library > Global Configuration > Import.
- Select Koha as the import source.
- Upload your Koha database backup file (.sql or .sql.gz).
- Click Configure Import.
- Once the database preparation step is complete, configure how libraries, categories, and document types should be mapped.
- Start the import. You can leave the page and return later to check progress.
LibraryThing Import
The LibraryThing import processes a CSV file exported from your LibraryThing account. It imports documents along with their items, languages, and active borrowings.
To start a LibraryThing import:
- Export your LibraryThing collection to a .csv file (via LibraryThing's export feature).
- Go to Dashboard > AF > Library > Global Configuration > Import.
- Select LibraryThing as the import source.
- Upload the CSV file and click Import.
- On the configuration page, map each LibraryThing media type (e.g. Book, DVD) to an Oncord document type.
- Start the import.
The import maps LibraryThing fields such as Title, ISBN, Summary, Publication, Primary Author, Secondary Author, Languages, and Page Count to the corresponding Oncord document fields. If lending data is present in the export (patron name, check-out date, and return date), active borrowings are created automatically.
Approach Two: Import Library Items via CSV
A CSV library document import tool is available specifically to import documents / library items.
The CSV documents import tool is available via Dashboard > AF > Library > Documents > Import.
Before uploading your CSV, you will need to set up your library categories (Geography, History, Novels etc), along with any custom fields
(fields that don't already exist within Oncord).
Depending on how your current library is configured, you'll also likely need to split your CSV into multiple files, and run multiple imports.
You'll need separate CSV files for each "Document Type" (ie. a different CSV for books, DVDs etc.), as well as separate CSV files for each library category.
It's not currently possible to import borrower details via a CSV import, so you will need to manually configure borrowers after importing your library items.
It is worthwhile spending the time to "clean-up the data" before importing into Oncord, removing any columns / fields that are not required.
Importing Documents
To import documents and document items, upload a .csv or .txt file from Library >
Documents > Import. The process of importing documents to your
AF library involves the following steps:
What Fields can be Imported?
The fields below are the fields that can be imported to the library and which are available for selection on the Import Configuration step.
You don't have to have all these fields present in your file.
| Document Fields | Description |
| id | If not defined, the ID is auto-generated by the system. |
| isbn | The document's International Standard Book Number. |
| issn | The document's International Standard Serial Number (for periodicals). |
| number | Periodical Number / Issue |
| part_number | Part / Tome Number |
| title | The document's title (required). |
| subtitle | The document's subtitle. |
| synopsis | A summary or description of the document. |
| comments | Internal comments or notes about the document. |
| date | The document's publication date (format: YYYY-MM-DD). |
| year | The document's release or publication year (format: YYYY). |
| physical_description_pages | The document's number of pages. |
| physical_description_dimensions | The document's physical dimensions. |
| censorship_rating | The document's age or content classification rating. |
| is_invisible | Set to 1 to hide the document from the public catalogue. |
| not_borrowable | Set to 1 to prevent the document from being borrowed. |
| picture | A URL or file path for the document's cover image. |
| online_views | The number of times the document has been viewed online. |
| tags | Search tags associated with the document (used for catalogue search). |
| author | The document's author or director. |
| series | The series or collection the document belongs to. |
| publisher | The document's publisher or producer. |
| language | The document's language. |
| Document Item Fields | Description |
| Item Code | A unique barcode or identifier for the physical copy (e.g. a barcode number). |
| Item Call Number | The shelf location or classification number (e.g. a Dewey Decimal number). |
| Item Status | The current status of the item. Accepted values: available, borrowed, reserved, lost, withdrawn, on site consultation, deteriorated, importing, deposit, under reparation, being processed. |
| Item Acquisition Date | The date the item was acquired by the library (format: YYYY-MM-DD). |
File Upload
When selecting a file to upload documents and document items, only .csv and .txt files are accepted.
You also have the option to set the Field Separator and Enclosed With options for your file. If you are not sure which settings to use, leave them set to Auto-detect and the importer will determine the correct format automatically.
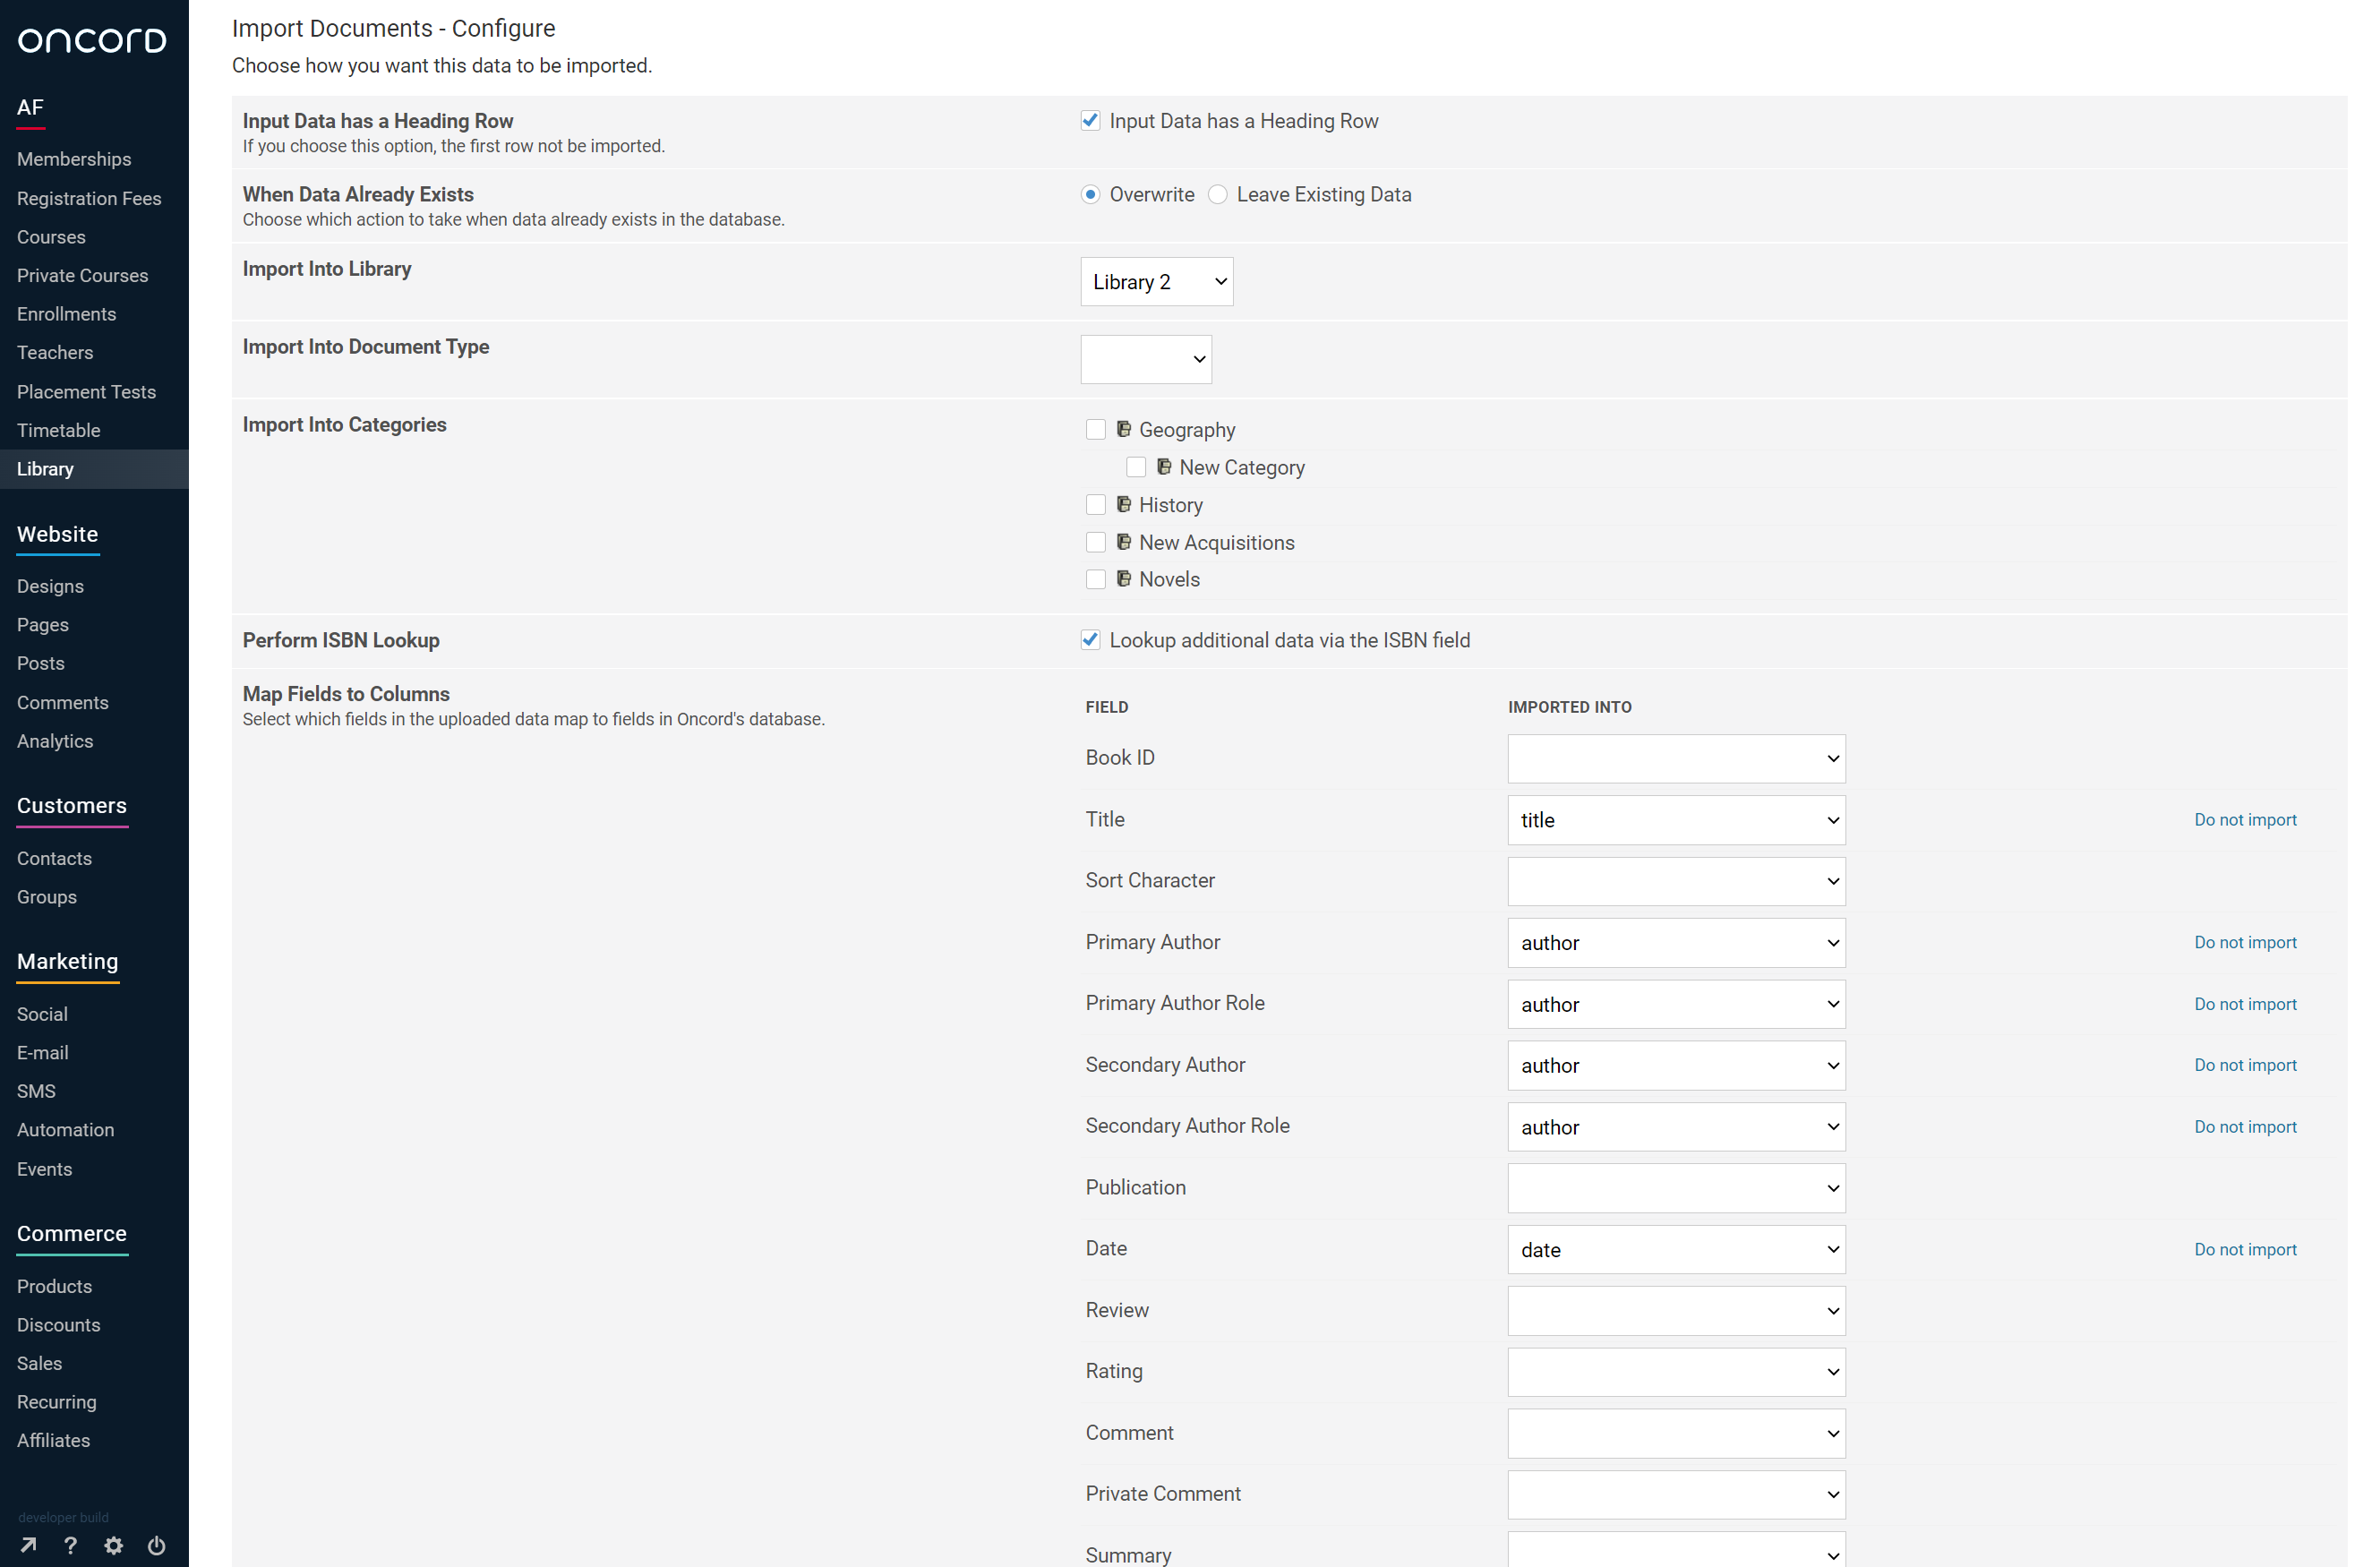
Import Configuration
After uploading your file, the Import Configuration step allows you to define how your data is imported. On this page, you will:
- Indicate whether your file includes a heading row (the first row of column names will not be imported).
- Choose whether to overwrite existing data when a matching document is already in the database, or leave the existing data unchanged.
- Select the Library to import the items into.
- Select the Document Type to assign to all imported documents (e.g. Book, DVD, Magazine).
- Select one or more Categories to assign to all imported documents.
- Optionally enable ISBN Lookup, which will automatically fetch additional metadata (such as title, author, and cover image) from online databases for up to 15 documents.
- Map your CSV columns to Oncord document fields. The importer will attempt to automatically match your column headings to the correct fields. You can adjust these mappings manually, and mark any columns as "Do not import" if they should be skipped.
Once you are satisfied with the configuration, click Preview Import to continue.
Import Preview
The Import Preview step displays a table of the documents and items that are about to be imported. This allows you to review the data before it is written to the database.
For each document, the preview shows the ISBN, title, subtitle, editor, author, series, language, country, year, and any linked items (with their item code and call number).
- If any fields are missing (e.g. a document has no title), you can fill them in directly from the preview table.
- You can also upload a cover image for individual documents from this page.
- If the ISBN Lookup option was enabled, any additional metadata retrieved will be pre-filled.
- Documents with matching ISBNs or titles already in the database will be linked to the existing records.
- Multiple rows in your CSV with the same ISBN will be grouped as a single document with multiple items.
When you are ready, click Import Now to write the data to the database.
What's Next?
After the import, review your documents in Dashboard > AF > Library > Documents to confirm the data was imported correctly. If your CSV only contained document-level data (without item codes), you will need to add document items manually before the documents are visible in the public catalogue, as documents without at least one item are not displayed.
You may also want to:
- Verify that documents are assigned to the correct categories and document types.
- Add or edit cover images for your documents.
- Set up borrower accounts if you need to track borrowings.
- Run additional imports for other document types or categories, using a separate CSV for each.